Looking for a hairstyle that elevates your look without requiring three hours in front of a mirror? Updos and braided buns strike the ultimate balance between high-end sophistication and practical wearability. From black-tie weddings and formal networking events to low-key weekend brunches, the right hair idea can completely transform an outfit.
Whether you are working with clean, freshly washed locks or rely on a healthy splash of dry shampoo to get through the day, mastering a few key styling techniques is all it takes. Here are 15 dynamic updo and braided bun ideas to help you step up your hair game for any occasion.
1. The Crown Braid Chignon
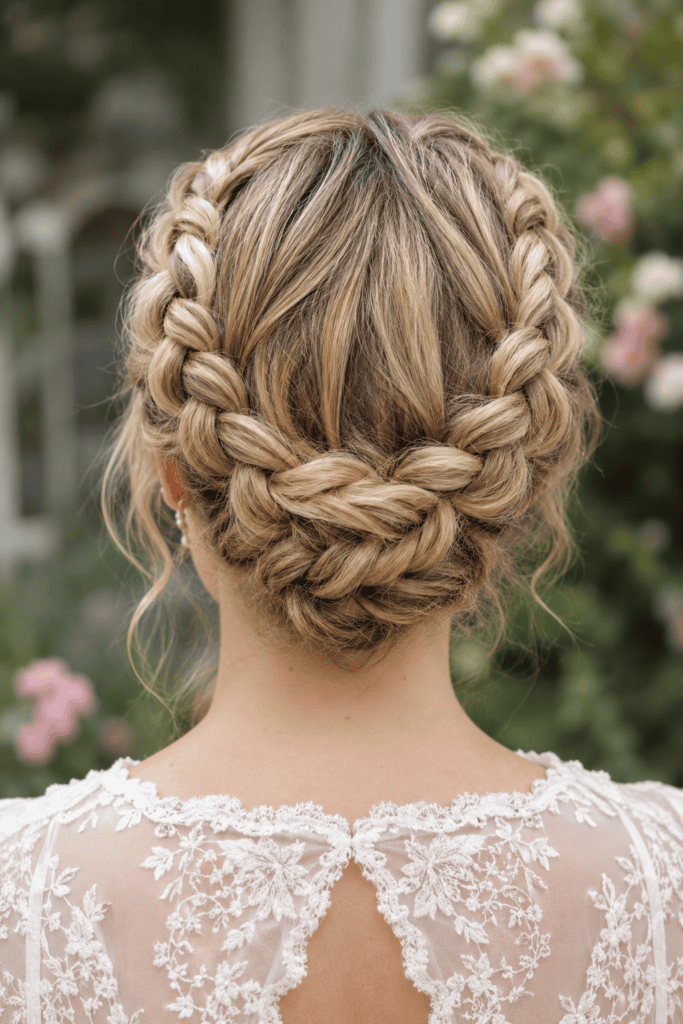
The Crown Braid Chignon combines the regal feel of a Dutch braid with the classic polish of a low neck bun. I wore this exact style to my cousin’s summer wedding last year, and it stayed flawless through eight hours of heat and heavy dancing. You create a focal point around the front of your head while keeping the back secure and tidy.
To create this look, follow these simple steps:
- Section your hair down the center and create two Dutch braids starting from the hairline down to the nape of your neck.
- Cross the ends of the braids over each other at the base of your head.
- Roll the remaining tail upward into a tight, flat roll and secure it with strong U-shaped hairpins.
- Gently pull at the outer edges of the braid loops to create softness and volume.
This style works best on hair with a bit of natural or added texture. If your hair feels too clean or silky, spray a generous amount of dry texturizing spray from roots to ends before you start braiding. The added grip prevents the braid from slipping out halfway through your event.
Step 1: Section down center -> Step 2: Dutch braid both sides -> Step 3: Cross tails at nape -> Step 4: Roll & pin securely
2. The Sleek Low Twisted Bun
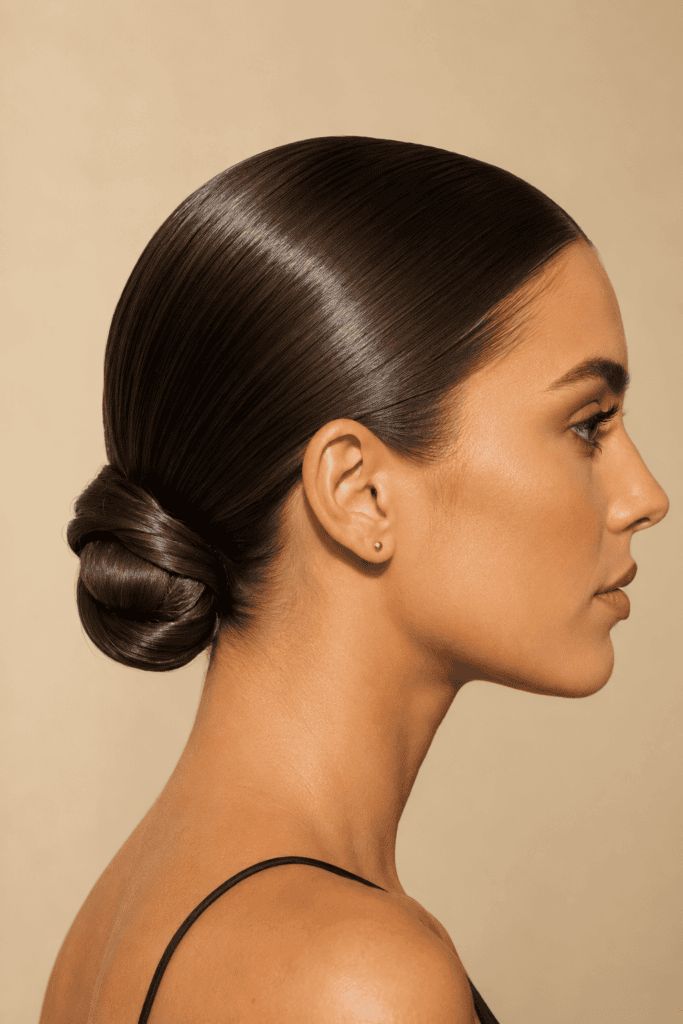
If you prefer clean lines over bohemian texture, this polished look delivers instant sophistication. It takes less than ten minutes, yet it looks like you spent hours in a stylist’s chair. TBH, this is my ultimate go-to when I want to look like I have my life completely together.
Start by creating a sharp middle part using a fine-tooth comb. Apply a lightweight smoothing styling cream to tame any flyaways before pulling your hair back into a low ponytail. Split the ponytail into two equal sections, twist them around each other to the ends, and wrap that thick twist around the base.
Lock it down with five or six bobby pins inserted directly toward the center of the bun. Finish with a quick mist of flexible hold hairspray to lock down any remaining baby hairs. This look pairs exceptionally well with high-neck gowns, sleek blazers, and bold gold hoop earrings.
3. The Textured French Twist
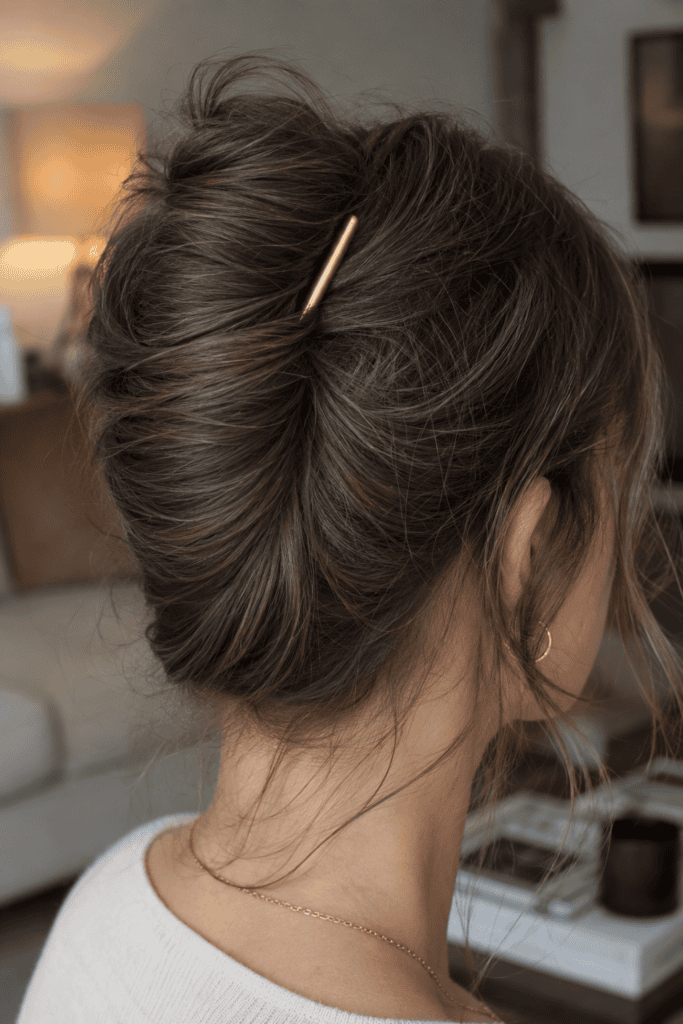
Forget the rigid, rock-hard French twists from nineties beauty pageants. Modern updates feature touchable volume, soft face-framing tendrils, and an airy structure that looks romantic rather than stiff. I love wearing this style when I want to showcase delicate neckline details or statement jewelry.
- Gather your hair into a mid-level ponytail using your hands instead of a brush for added natural texture.
- Twist the hair upward toward the crown of your head, tucking the ends inside the vertical roll.
- Insert a large french hair pin down through the top of the roll, catch a bit of scalp hair, and flip the pin down to lock it in place.
- Pull out tiny strands around your ears and temples to frame your face softly.
This look works brilliantly on medium to long hair lengths. It highlights your collarbones and shows off your favorite earrings without distracting from your overall outfit.
4. The Hollywood Wave Updo
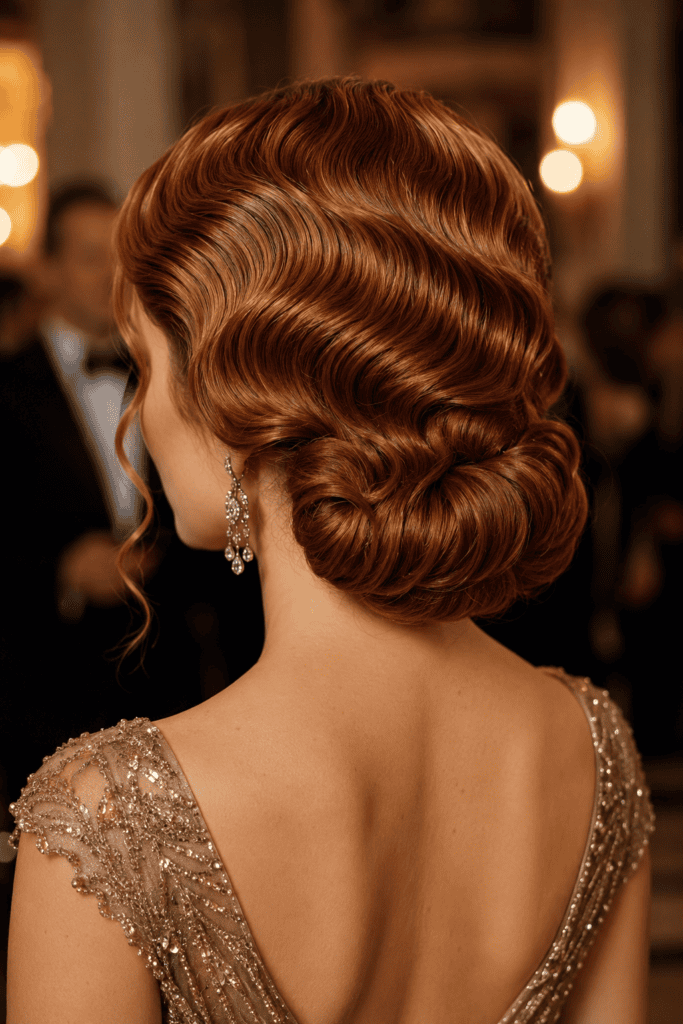
Want full-on classic glamour? The Hollywood Wave Updo channels vintage screen sirens while keeping your hair securely off your shoulders all night long. It offers all the visual drama of old-school red carpet waves with the security of a pinned updo.
I tried this look for an gala earlier this year after watching a red-carpet stylist demonstrate the technique. You start by curling your entire head in the same direction using a 1-inch curling iron. Brush out the curls with a paddle brush until they form uniform, shiny waves.
Instead of leaving them down, gather the waves loosely at the nape of your neck. Fold the length back under itself to form an elongated, wide bun. Pin the structure securely from underneath so the top layer retains those stunning, continuous wave patterns.
5. The High Braided Topknot
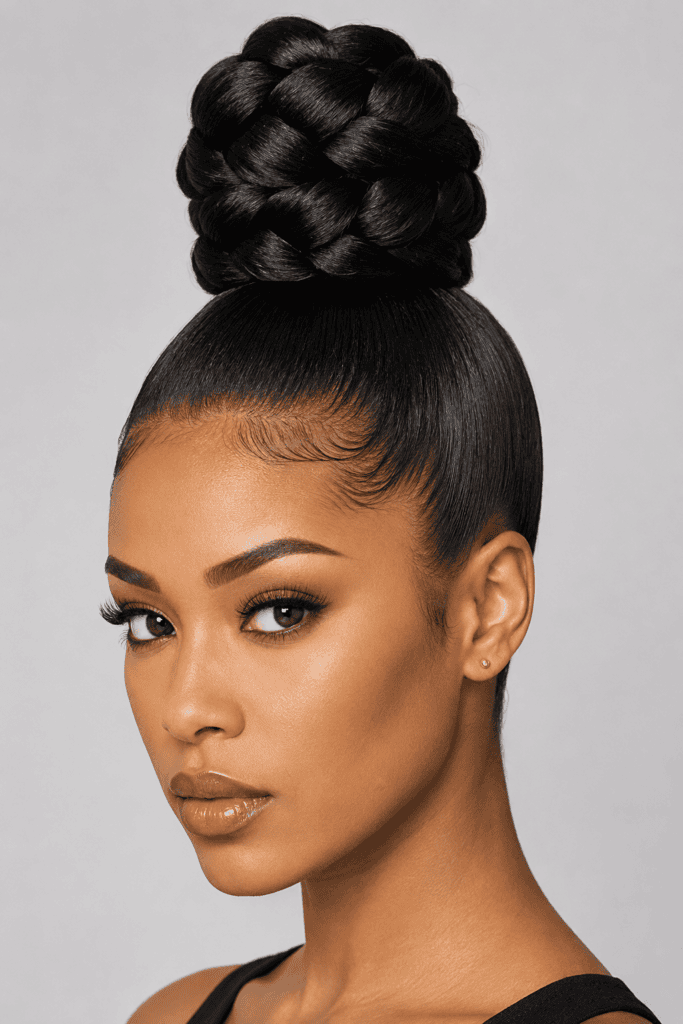
Take your basic topknot and give it a structural upgrade. The High Braided Topknot adds height, elongates your neck, and pulls your features up for a subtle, flattering lift.
Freya’s Styling Tip: Never braid a topknot too tightly from the base! Braid with medium tension, secure the ends with a clear elastic, and pancake the braid outward before wrapping. This technique instantly doubles the visual volume of your bun.
Smooth your hair upward into a high ponytail sitting right at the crown. Secure it with a sturdy hair elastic that won’t slip during the day. Braid the ponytail using a classic three-strand technique, secure the end, and wrap the braid around the base. Pin as you go, ensuring the bun sits high and firm.
6. The Double Dutch Braid Low Bun
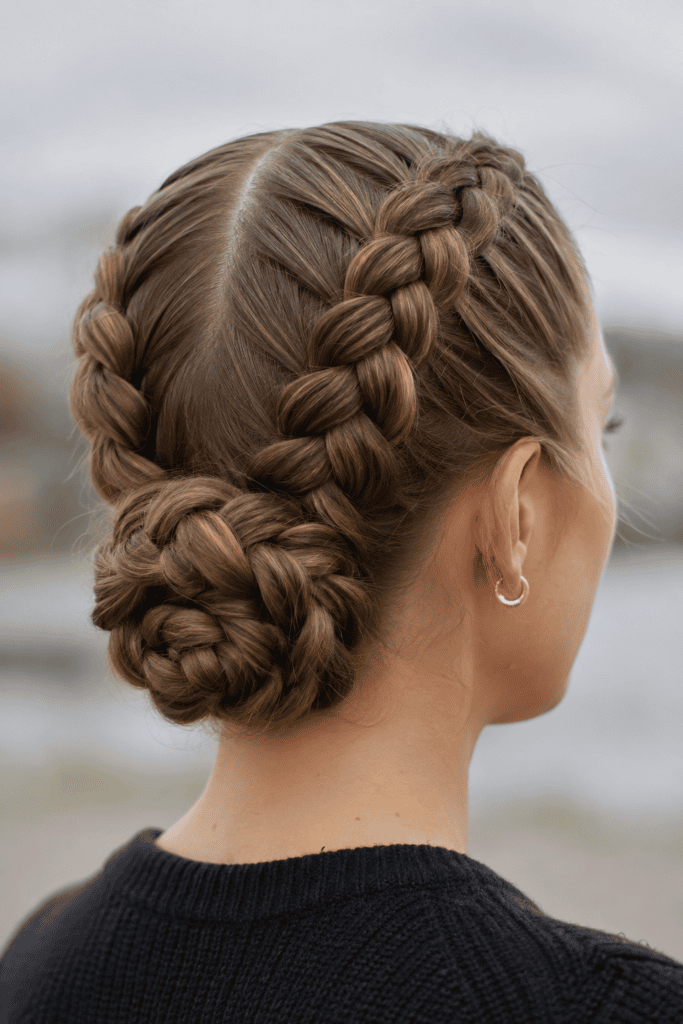
Who says you can’t blend athletic style with formal elegance? The Double Dutch Braid Low Bun brings incredible detail to the sides of your head, converging into a neat, textured knot at the bottom.
- Part your hair straight down the middle from your forehead to the nape of your neck.
- Create a Dutch braid (crossing strands under instead of over) on each side, keeping close to the scalp.
- Stop braiding once you hit the nape, and combine both tails into a single ponytail.
- Twist the combined tail into a compact circular bun and secure it with a heavy-duty elastic.
This style holds up exceptionally well on windy outdoor rooftops or humid evening events. It keeps every single stray hair locked into place without requiring half a bottle of hairspray.
7. The Fishtail Chignon
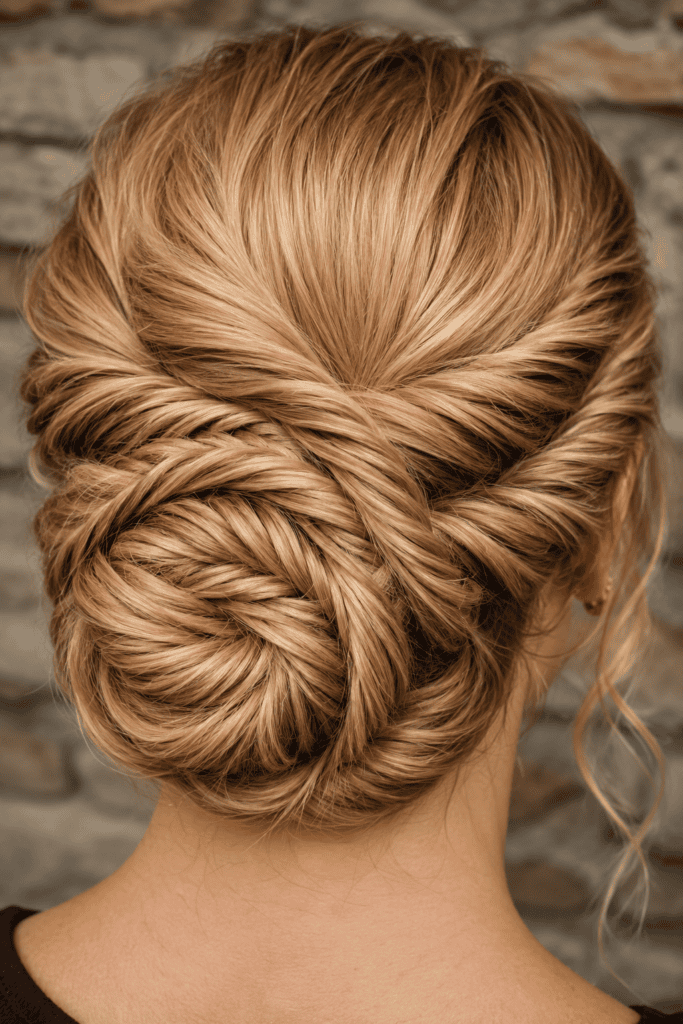
Fishtail braids look intricate and complicated, but they are actually remarkably easy to execute once you get into the rhythm. Bringing that woven detail into a low chignon yields a show-stopping hairstyle that gets continuous compliments.
Divide a low ponytail into two equal halves. Take a tiny strand from the outside of the left section and cross it over to the right section. Repeat the process on the right side, taking a tiny strand and crossing it to the left. Continue all the way down, then roll that gorgeous fishtail braid into a flat spiral at the base of your neck.
Fishtail Technique Breakdown:
Section A (Left) <--- [Take tiny outer strand] ---> Cross over to Section B (Right)
Section B (Right) <--- [Take tiny outer strand] ---> Cross over to Section A (Left)
8. The Messy Rope-Twist Bun
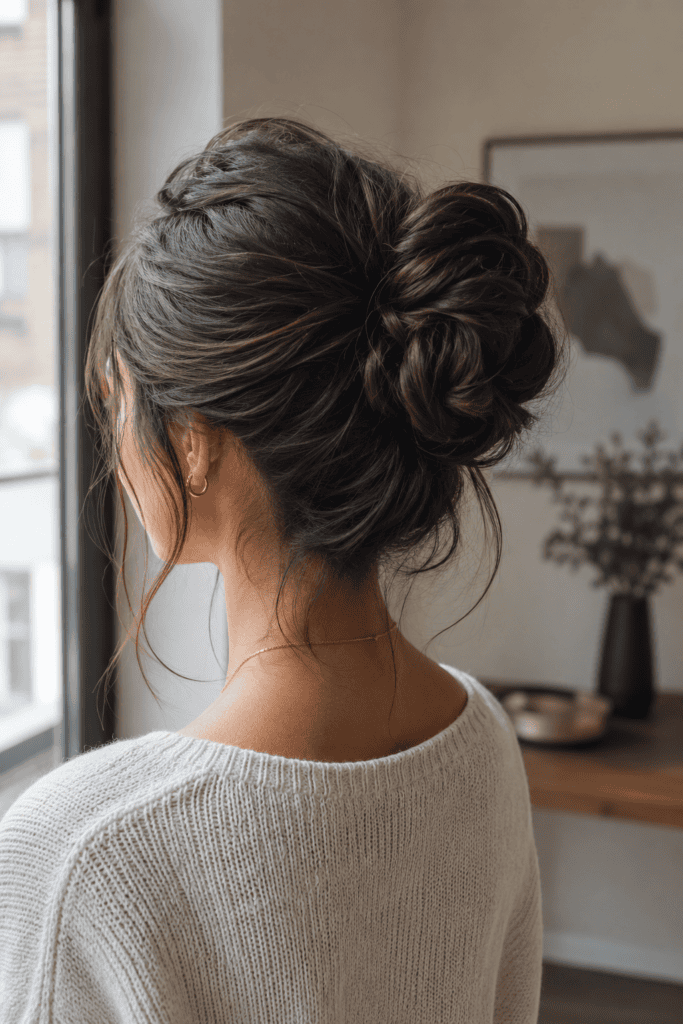
Ever wondered why some women look effortlessly chic in a low-effort bun while the rest of us look like we just woke up from a three-hour nap? The secret lies in the Rope-Twist Bun.
Instead of a basic messy bun that collapses after an hour, a rope twist holds its shape while maintaining an intentional, undone look.
- Gather your hair into a mid-height ponytail and split the tail into two halves.
- Twist both individual strands clockwise, then cross the two strands around each other counter-clockwise.
- Wrap the rope twist around your ponytail base and secure it with a few open-ended hairpins.
- Gently tug at random sections of the bun to create soft, lived-in volume.
I rely on this exact style on busy workdays. It takes two minutes, requires zero heat tools, and works seamlessly with everything from a tailored blazer to a relaxed graphic tee.
9. The Pull-Through Braided Bun
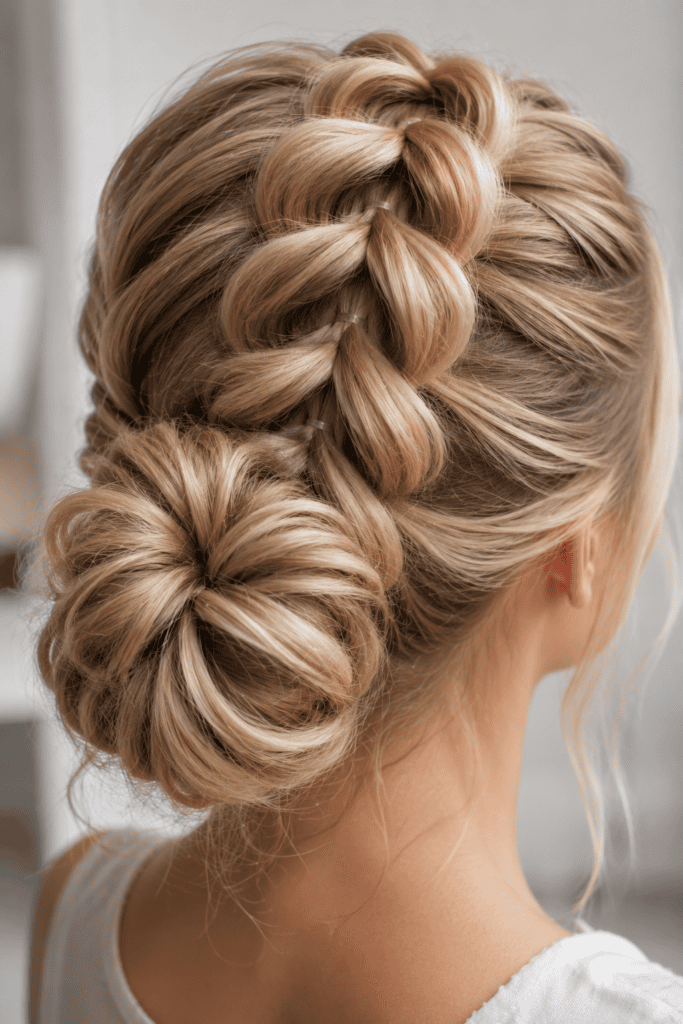
If you have fine or thin hair, traditional braids can sometimes end up looking a bit sparse. The Pull-Through Braided Bun is the ultimate styling hack for creating massive visual volume out of thin air.
Create a ponytail at the back of your head and split it into a top and bottom section. Divide the top section in two, wrap those pieces around the bottom section, and secure them with a clear mini elastic. Repeat this process down the length of your ponytail, flouffing each section outward as you go.
Once you reach the end, roll the voluminous faux-braid into a loose bun and pin it in place. The elastic structure supports the weight of the hair, making your bun look twice as thick as it actually is.
10. The Boho Milkmaid Braids
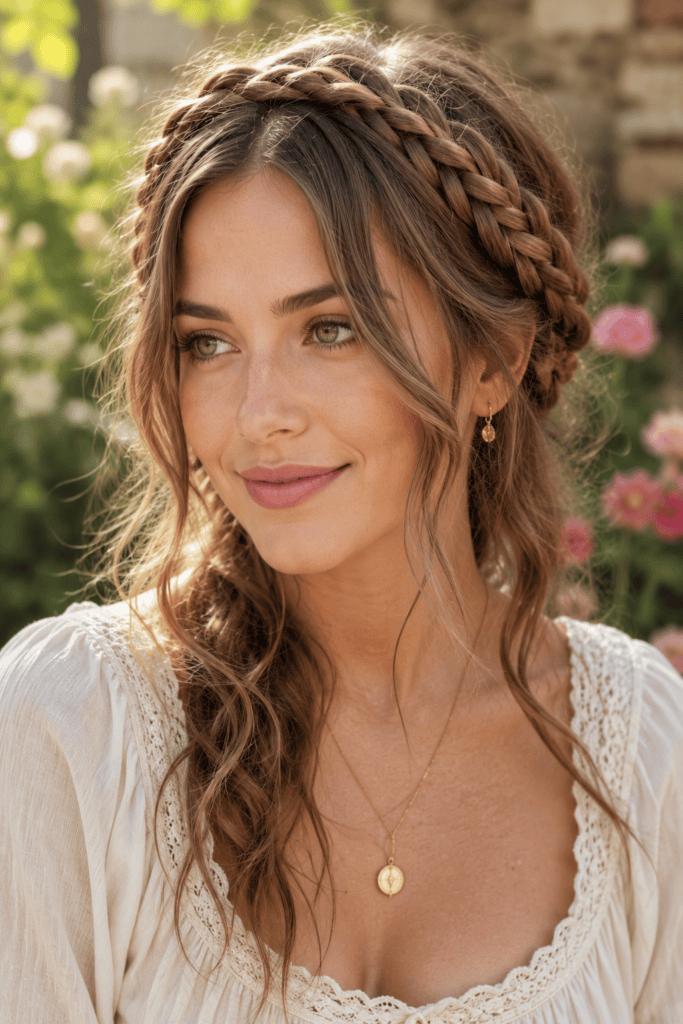
Milkmaid braids offer a charming, vintage-inspired look that works equally well for outdoor music festivals, Sunday brunches, or casual errands. They keep hair completely off your neck while framing your face with romantic braid details.
- Divide your hair into two equal pigtail sections behind your ears.
- Braid each pigtail completely to the ends using a standard three-strand braid and secure with small elastics.
- Wrap the right braid over the top of your head like a headband and pin it behind your left ear.
- Wrap the left braid over the top in the opposite direction, tucking the tail under the first braid before pinning.
I love pairing this style with a flowing floral dress or a denim jacket. It gives off a sweet, creative vibe without requiring any heat styling or complex curling routines.
11. The Side-Braided Low Bun
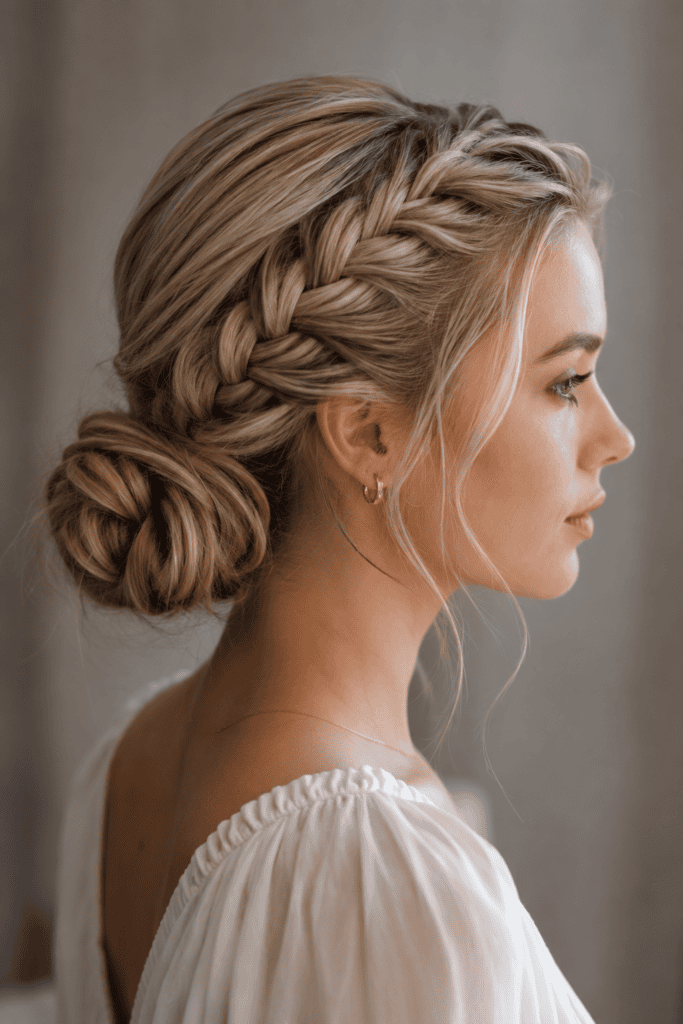
If you want an asymmetrical twist on a traditional updo, the Side-Braided Low Bun delivers visual interest from every angle. It places the intricate braid detail along one side of your face while keeping the bun centered or offset.
Start a French braid at your temple on your preferred side, working along your hairline toward the nape of your neck. Gather the remaining unbraided hair along with the braid tail into a low off-center ponytail.
Twist the ponytail into a soft, round bun and secure it with hairpins. This style highlights your profile beautifully and works wonders for showcasing drop earrings or asymmetrical top necklines.
12. The Bubble Braid Updo
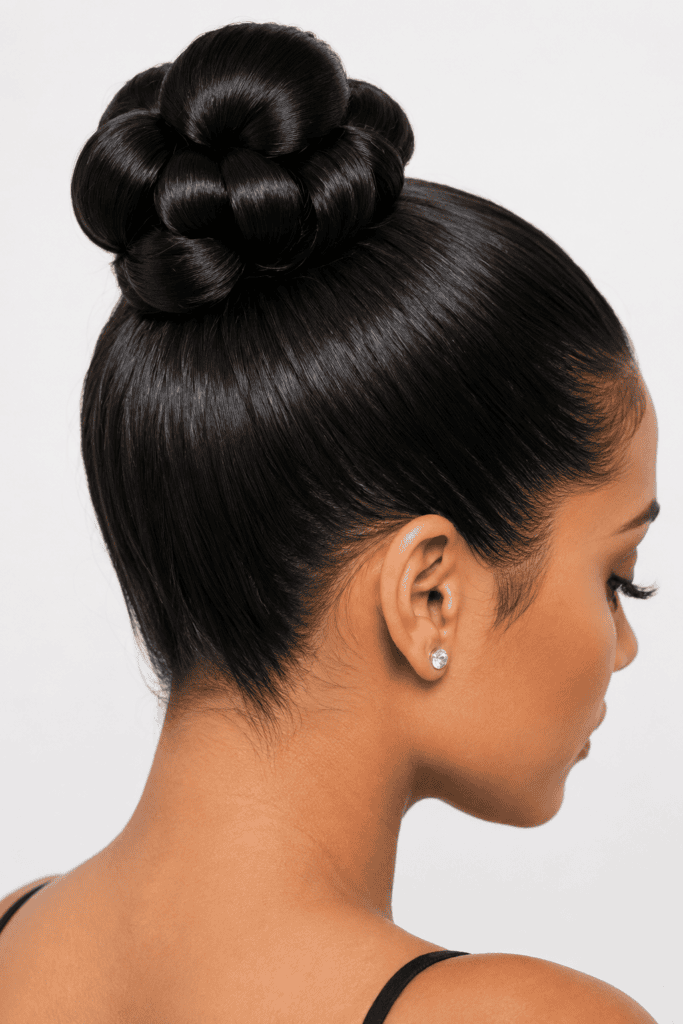
Bubble braids dominated social media feeds last season, and turning them into an updo gives the trend a fresh, modern twist. This look is playful, graphic, and surprisingly sturdy for long days.
- Secure your hair into a high or mid-level ponytail using a strong hair tie.
- Place additional clear elastic bands every two inches down the length of the ponytail.
- Pull outward on the hair between each elastic to create round “bubbles.”
- Wrap the bubbled ponytail around the primary base and pin the end underneath securely.
This style provides instant structure without needing complex braiding skills. It works exceptionally well on straight or blown-out hair where you want sharp, clean shapes.
13. The Half-Up Braided Bun
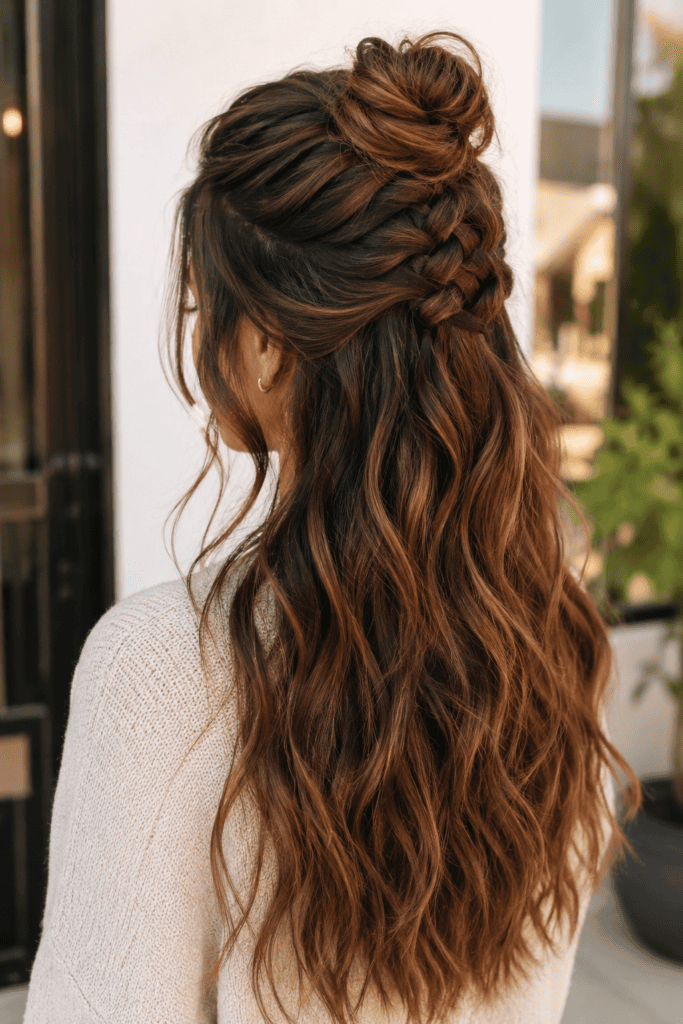
Cannot decide between leaving your hair down or pinning it up? The Half-Up Braided Bun gives you the absolute best of both worlds. You keep length and texture around your shoulders while sweeping front strands away from your face.
Section off the top third of your hair, starting from the arches of your eyebrows back to your crown. Braid this top section into a loose Dutch or French braid, ending at the back of your head.
Spin the remaining tail into a cute topknot bun and pin it down while leaving the lower two-thirds of your hair flowing free. IMO, adding quick beach waves to the loose bottom layer elevates this casual look into something truly special.
14. The Playful Space Buns
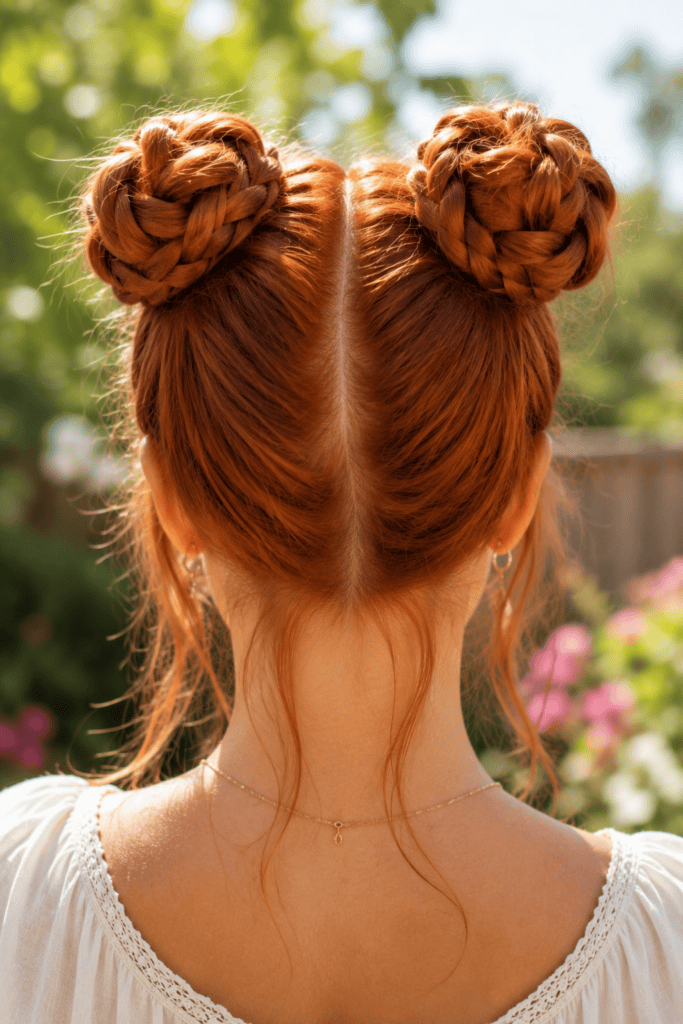
Who says space buns belong exclusively to festival grounds? When styled with clean braided details, dual buns offer a fun, bold look that shows off your personality.
- Split your hair clean down the middle into two symmetrical high pigtails.
- Braid each pigtail down to the ends and fan out the braid loops for volume.
- Wrap each braid around its own elastic base to form two neat twin buns on the crown.
- Anchor both buns with strong bobby pins inserted around the outer edges.
I wear this style whenever I want an upbeat, high-energy look for casual weekend outings. It stays completely secure during workout classes or outdoor activities without needing touch-ups.
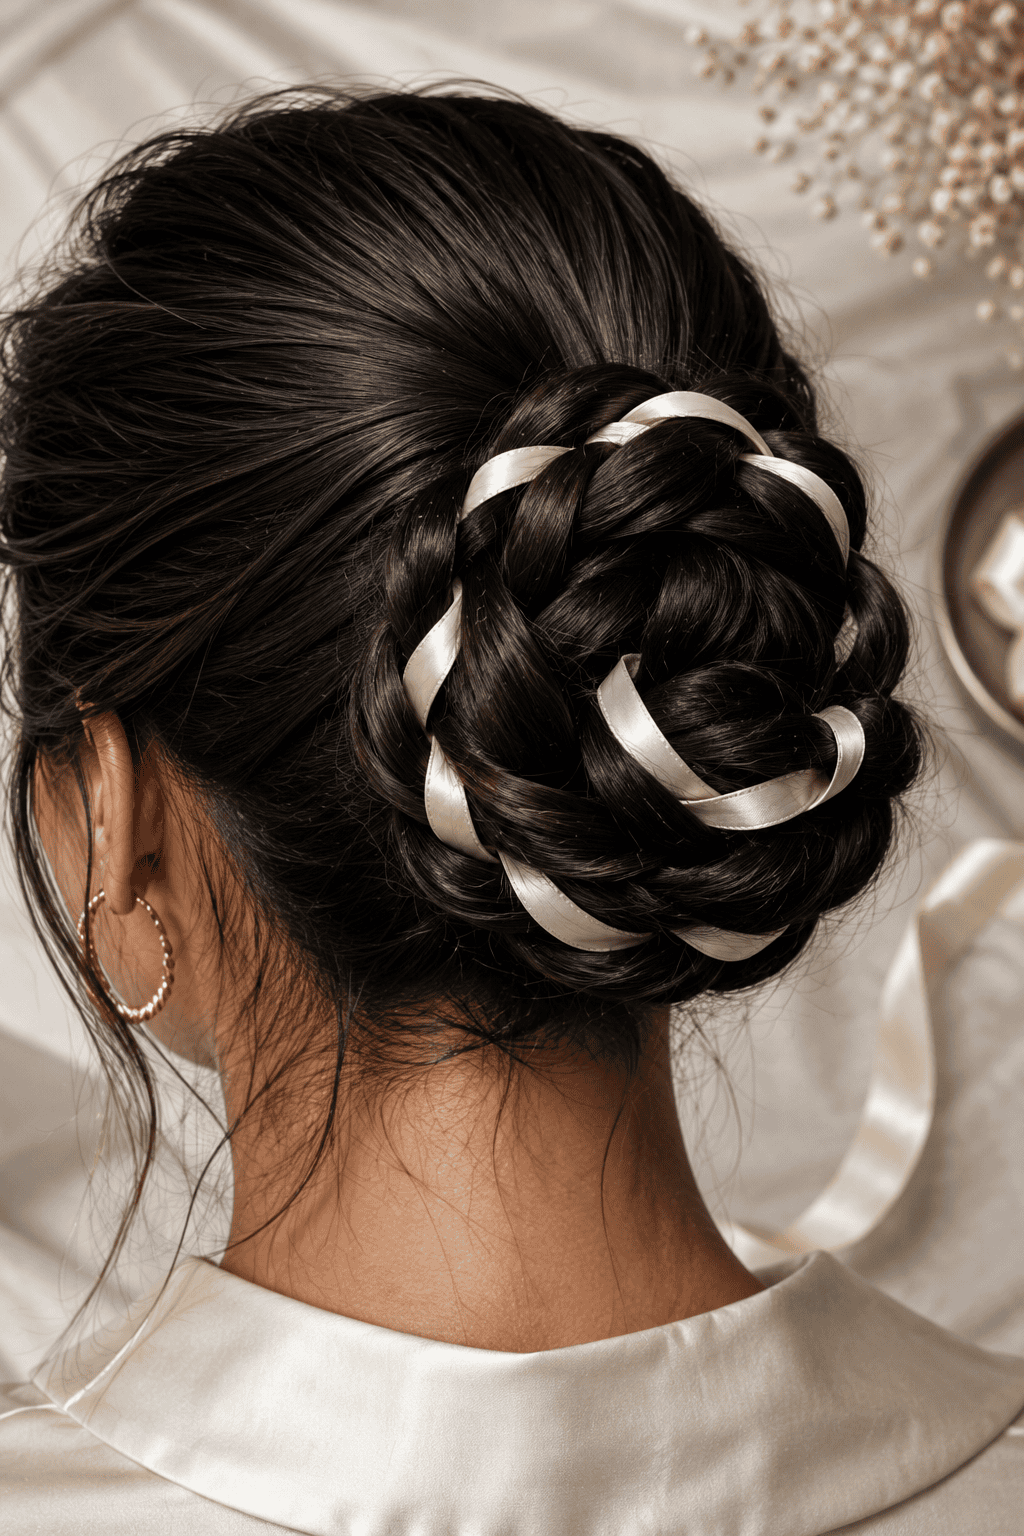
15. The Wrapped Ribbon Braided Bun
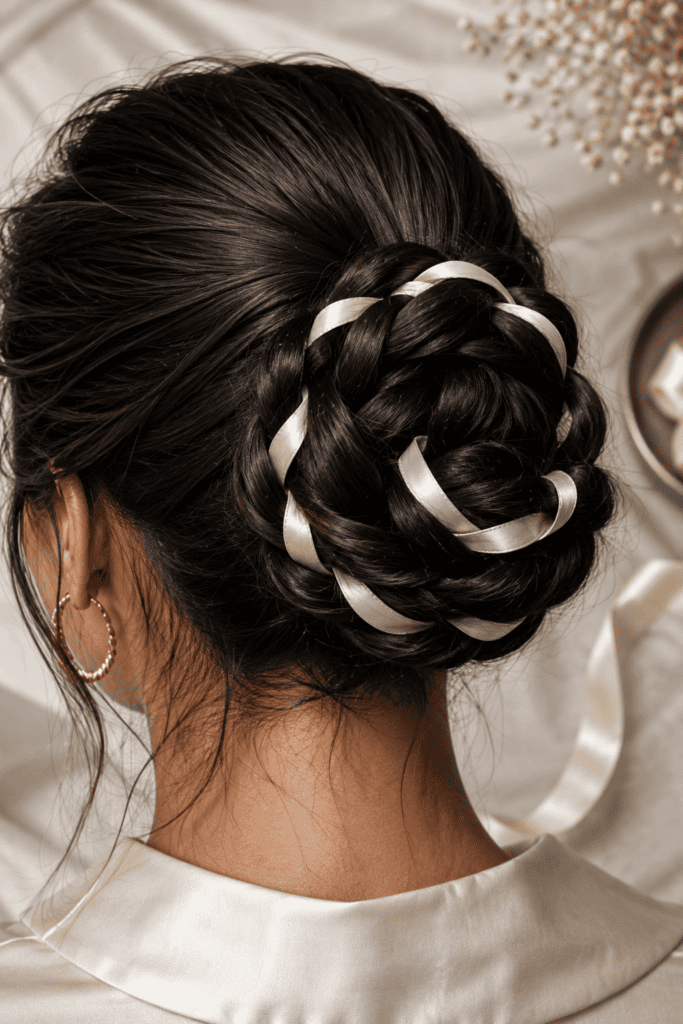
Adding an accessory directly into your braid elevates a simple updo into a personalized fashion statement. Incorporating a silk ribbon or scarf adds texture, color, and instant charm to your hairstyle.
Anchor a long silk ribbon around the base of your ponytail before you start braiding. Treat the two ends of the ribbon as one of your three braid strands as you weave down to the end.
Wrap the ribbon-infused braid into a classic bun and let the remaining ribbon tails hang loose underneath. This subtle touch instantly ties your hair look directly to the colors of your outfit or accessories.
Style Summary & Care Guide
Creating stunning updos does not require professional salon tools or hours of painstaking work. Mastering a few fundamental techniques—like pancaking braids, prepping with texturizing spray, and using proper hairpin placement—allows you to create any of these 15 looks with confidence.
| Hairstyle | Best For | Prep Product | Prep Time |
| Crown Braid Chignon | Weddings, Galas | Texturizing Spray | 15 Mins |
| Sleek Low Twisted Bun | Formal Events, Work | Smoothing Cream | 8 Mins |
| Messy Rope-Twist Bun | Everyday, Casual | Dry Shampoo | 3 Mins |
| Bubble Braid Updo | Concerts, Parties | Light Hold Hairspray | 5 Mins |
Next time you face a hair dilemma or a bad hair day, skip the standard ponytail and try one of these braided bun ideas instead. Practice the steps in front of your mirror when you have a few free minutes so you feel ready when event invitations arrive. 🙂
Which look are you going to try first? Tag me in your hair creations—I cannot wait to see how you style these ideas!
Stay stylish,
Freya Weston